The joys of having a laptop capable of development, I'm seriously in love with my Ultrabook. This isn't just me shilling for the company, I'm totally sold on this thing. Apple did right by forcing people to figure out how to build smaller, lighter laptops that still pack serious development punch. For reference, I'm currently working off of a Gigabyte U2442, would be nice to get something that has a Core i7 CPU, but this one's a Core i5 at 3.1 with a mobile Geforce 6xx, so I'm happy with it. Made it easy for me to bang out this second depth sample from the comfort of a...actually I think it was a bar as opposed to a coffee shop...

The Technolust, i sorta haz it...
The Technolust, i sorta haz it...
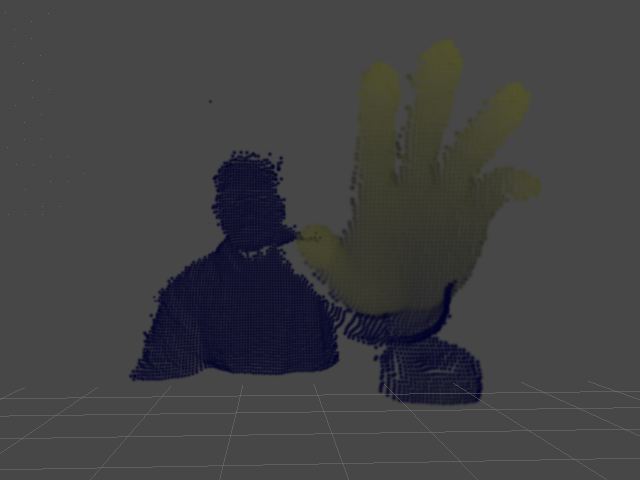
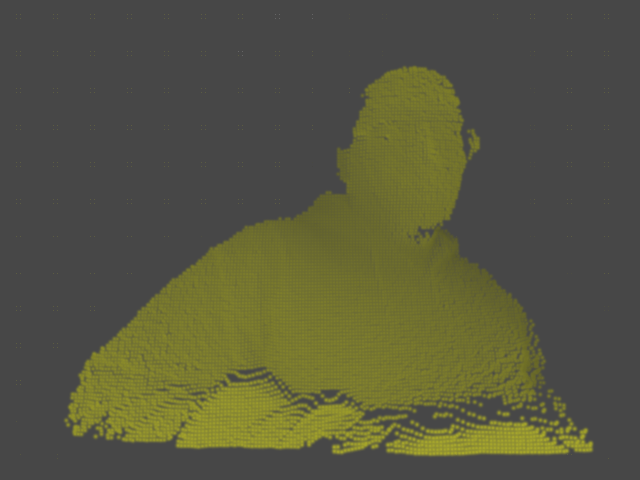
I mentioned in my last post I'd been messing around with some other methods for visualizing depth from the Creative Camera, I took a few moments after GDC to decompress and finish this one up, it sorta builds off the last sample. Instead of visualizing a texture, I'm using the depth to set attributes on some particles to get that point cloudy effect that everyone seems to know and love. This one's a bit more complex, mainly because I added a few parameters to tweak the visualization, but if you've got some Unity under your belt, none of this will be that tricky, and in fact, you'll probably see pretty quickly how setting particle data is very similar to setting pixel data. I should also note that the technique presented here could apply to any sort of 3d camera, pretty much if you can get an array of depth values from your input device, you can make this work. So here's what we're trying to accomplish when all's said and coded:
Since this is a Unity project, we'll need to set up a scene first. All that's required for this is a particle system, which you can create from the GameObject menu (GameObject > Create Other > Particle System). Set the particle system's transforms (translate and rotate) to 0,0,0 and uncheck all the options except for Renderer. Next, set the Main Camera's transform to 160,120,-240, and our scene is ready to go. That all in place, we can get to coding. We'll only need a single behavior for this test, which we'll put on the particle system. I called mine PDepth, but you'll call it Delicious (or whatever else suits your fancy)! First, let's set up our particle grid and visualization controls:
//We'll use these to control our particle system
public float MaxPointSize;
public int XRes, YRes;
private ParticleSystem.Particle[] points;
private int mXStep, mYStep;
public float MaxPointSize;
public int XRes, YRes;
private ParticleSystem.Particle[] points;
private int mXStep, mYStep;
- MaxPointSize: This controls the size of our particles
- XRes, YRes: These control the number of particles in our grid
- points: This container holds our individual particle objects
- mXStep, mYStep: These control the spacing between particles (this is calculated, not set manually)
With those in place, we can populate our particle grid and get some stuff on screen. Here's what our initial Start() and Update() methods should look like:
void Start()
{
points = new ParticleSystem.Particle[XRes*YRes];
mXStep = 320/XRes;
mYStep = 240/YRes;
int pid=0;
for(int y=0;y<240;y+=mYStep)
{
for(int x=0;x<320;x+=mXStep)
{
points[pid].position = new Vector3(x,y,0);
points[pid].color = Color.white;
points[pid].size = MaxPointSize;
++pid;
}
}
}
void Update()
{
particleSystem.SetParticles(points, points.Length);
}
{
points = new ParticleSystem.Particle[XRes*YRes];
mXStep = 320/XRes;
mYStep = 240/YRes;
int pid=0;
for(int y=0;y<240;y+=mYStep)
{
for(int x=0;x<320;x+=mXStep)
{
points[pid].position = new Vector3(x,y,0);
points[pid].color = Color.white;
points[pid].size = MaxPointSize;
++pid;
}
}
}
void Update()
{
particleSystem.SetParticles(points, points.Length);
}
If you're wondering where the values 320 and 240 came from, we're making some assumptions about the size of our depth map to set the initial bounds. Once we add in the actual depth query, we'll fix that and not have to rely on hardcodes. Otherwise, if all went according to plan, we should have a pretty grid of white particles. Be sure to set some values for XRes, YRes, and MaxPointSize in the Inspector! For this example, I've used the following settings:
- XRes: 160
- YRes: 120
- MaxPointSize: 5
As I mentioned earlier, this procedure actually isn't too much different from the previous sample, in that we're building a block of data from the depth map then loading it into a container object, just in this case we're using an array of ParticleSystem.Particle objects instead of a Color array, and we're calling SetParticles() instead of SetPixels(). That in mind, you've probably already started figuring out how to integrate the code and concepts from the previous tutorial into this project, so let's go ahead and plow forward. First, well need to add a few more members to our behaviour:
public float MaxPointSize;
public int XRes, YRes;
public float MaxSceneDepth, MaxWorldDepth;
private PXCUPipeline mSession;
private short[] mDepthBuffer;
private int[] mDepthSize;
private ParticleSystem.Particle[] points;
private int mXStep, mYStep;
public int XRes, YRes;
public float MaxSceneDepth, MaxWorldDepth;
private PXCUPipeline mSession;
private short[] mDepthBuffer;
private int[] mDepthSize;
private ParticleSystem.Particle[] points;
private int mXStep, mYStep;
- MaxSceneDepth: The maximum Z-amount for particle positions
- MaxWorldDepth: The maximum distance from the camera to search for depth points
- mDepthBuffer: Intermediate container for depth values from the camera
- mDepthSize: Depth map dimensions queried from the camera. We'll replace our hardcoded 320,240 with this
The only major additions we need to make to our Start() method involve spinning up the camera and using some of that information to properly set up our particle system. Our new Start() looks like this:
void Start()
{
points = new ParticleSystem.Particle[XRes*YRes];
mXStep = mDepthSize[0]/XRes;
mYStep = mDepthSize[1]/YRes;
int pid=0;
for(int y=0;y<mDepthSize[1];y+=mYStep)
{
for(int x=0;x<mDepthSize[0];x+=mXStep)
{
points[pid].position = new Vector3(x,y,0);
points[pid].color = Color.white;
points[pid].size = MaxPointSize;
++pid;
}
}
}
{
mDepthSize = new int[2];
mSession = new PXCUPipeline();
mSession.Init(PXCUPipeline.Mode.DEPTH_QVGA);
mSession.QueryDepthMapSize(mDepthSize);
mDepthBuffer = new short[mDepthSize[0]*mDepthSize[1]];
mSession = new PXCUPipeline();
mSession.Init(PXCUPipeline.Mode.DEPTH_QVGA);
mSession.QueryDepthMapSize(mDepthSize);
mDepthBuffer = new short[mDepthSize[0]*mDepthSize[1]];
points = new ParticleSystem.Particle[XRes*YRes];
mXStep = mDepthSize[0]/XRes;
mYStep = mDepthSize[1]/YRes;
int pid=0;
for(int y=0;y<mDepthSize[1];y+=mYStep)
{
for(int x=0;x<mDepthSize[0];x+=mXStep)
{
points[pid].position = new Vector3(x,y,0);
points[pid].color = Color.white;
points[pid].size = MaxPointSize;
++pid;
}
}
}
The bulk of the changes are going to be in the Update() method. The big difference between working with a particle cloud and a texture as in the previous example is that we need to know the x and y positions for each particle, thus the nested loops as opposed to a single loop for pixel data. This makes the code a bit more verbose, but not a ton more difficult to grok, so let's take a stab at building a new Update() method:
void Update()
{
particleSystem.SetParticles(points, points.Length);
}
{
if(mSession.AcquireFrame(false))
{
mSession.QueryDepthMap(mDepthBuffer);
int pid=0;
for(int dy=0;dy<mDepthSize[1];dy+=mYStep)
{
for(int dx=0;dx<mDepthSize[0];dx+=mXStep)
{
int didx = dy*mDepthSize[0]+dx;
if((int)mDepthBuffer[didx]>=32000)
{
points[pid].position = new Vector3(dx,mDepthSize[1]-dy,0);
points[pid].size = 0.1f;
}
else
{
points[pid].position = new Vector3(dx, mDepthSize[1]-dy, lmap((float)mDepthBuffer[didx],0,MaxWorldDepth,0,MaxSceneDepth));
float cv = 1.0f-lmap((float)mDepthBuffer[didx],0,MaxWorldDepth,0.15f,1.0f);
points[pid].color = new Color(cv, cv, 0.15f);
points[pid].size = MaxPointSize;
}
++pid;
}
}
mSession.ReleaseFrame();
}
{
mSession.QueryDepthMap(mDepthBuffer);
int pid=0;
for(int dy=0;dy<mDepthSize[1];dy+=mYStep)
{
for(int dx=0;dx<mDepthSize[0];dx+=mXStep)
{
int didx = dy*mDepthSize[0]+dx;
if((int)mDepthBuffer[didx]>=32000)
{
points[pid].position = new Vector3(dx,mDepthSize[1]-dy,0);
points[pid].size = 0.1f;
}
else
{
points[pid].position = new Vector3(dx, mDepthSize[1]-dy, lmap((float)mDepthBuffer[didx],0,MaxWorldDepth,0,MaxSceneDepth));
float cv = 1.0f-lmap((float)mDepthBuffer[didx],0,MaxWorldDepth,0.15f,1.0f);
points[pid].color = new Color(cv, cv, 0.15f);
points[pid].size = MaxPointSize;
}
++pid;
}
}
mSession.ReleaseFrame();
}
particleSystem.SetParticles(points, points.Length);
}
So like I said, a bit more verbose, but hopefully not terribly difficult to understand. A few things to be aware of:
We use the variable didx as an index into the depth buffer. The reason we do this is because our particles don't correspond 1:1 to values in the depth buffer, so we use each particle's x and y position to do the depth buffer lookup. In the next example, we'll take a look at how we can actually have a 1:1 depth buffer to particle setup using generic types.
Here, the reason we test against a depth value of 32000 is because this is what the Perceptual Computing SDK uses as the error term. So if the SDK can't resolve a depth value for a given pixel, it sends back 32000 or more. In this case, if we find an error term, we make the particle really small, but in the next example, we'll look at how we can skip that particle altogether if we have an error value. Finally, remember we need to implement some sort of range remapping function, I call mine lmap as a homage to Cinder's remap, but you can call it whatever, again, it's basically just:
int didx = dy*mDepthSize[0]+dx;
We use the variable didx as an index into the depth buffer. The reason we do this is because our particles don't correspond 1:1 to values in the depth buffer, so we use each particle's x and y position to do the depth buffer lookup. In the next example, we'll take a look at how we can actually have a 1:1 depth buffer to particle setup using generic types.
if((int)mDepthBuffer[didx]>=32000)
{
...
}
else
{
...
}
{
...
}
else
{
...
}
Here, the reason we test against a depth value of 32000 is because this is what the Perceptual Computing SDK uses as the error term. So if the SDK can't resolve a depth value for a given pixel, it sends back 32000 or more. In this case, if we find an error term, we make the particle really small, but in the next example, we'll look at how we can skip that particle altogether if we have an error value. Finally, remember we need to implement some sort of range remapping function, I call mine lmap as a homage to Cinder's remap, but you can call it whatever, again, it's basically just:
float lmap(float v, float mn0, float mx0, float mn1, float mx1)
{
return mn1+(v-mn0)*(mx1-mn1)/(mx0-mn0);
}
{
return mn1+(v-mn0)*(mx1-mn1)/(mx0-mn0);
}
So that's that, in the next sample, we'll look at some different ways to map the depth buffer to a particle cloud and use the PerC SDK's UV mapping feature to add some color from the RGB stream to the particles. Until then, email me, follow me on Twitter, find me on facebook, or otherwise feel free to stalk me socially however you prefer. Cheers!
What can i say, i love OpenNI...
What can i say, i love OpenNI...
No comments:
Post a Comment